OpenID Connect Integration
Viafoura’s OpenID Connect (OIDC) integration provides seamless identity provider integration with your existing OIDC compliant Identity Provider. This integration allows you to pass an identity to Viafoura from your web application, but is dependent on you having an existing authentication flow implemented with your Identity Provider.
Viafoura’s OIDC integration is designed to work with OIDC ID Tokens, which include profile information, and only requires front-end side integration.
Configuration
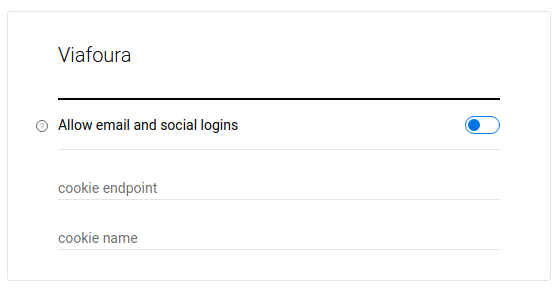
First, disable email and social Viafoura logins:
**
https://admin.viafoura.co/ → Settings → Authentication → Viafoura → Allow email and social logins.**

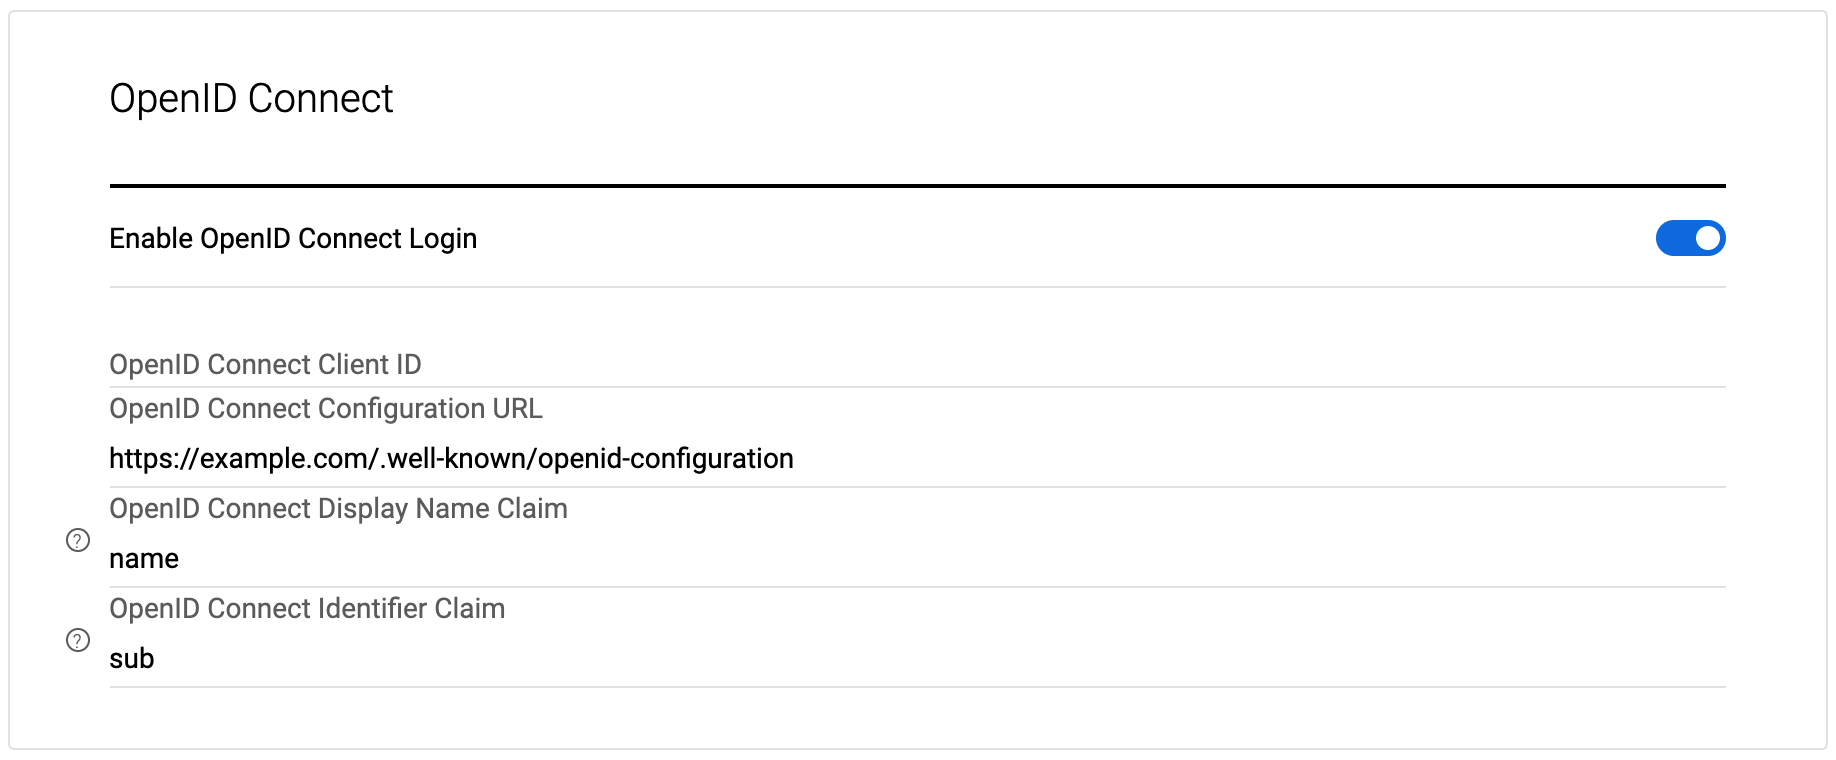
You will then need to go to the OpenID Connect settings set the Enable OpenID Connect Login to on, and enter:
- OIDC ID Provider’s Client ID
- Public URL to their OIDC well-known configuration JSON (ie. https://example.com/.well-known/openid-configuration)
Then save your settings.

NoteViafoura does not require an OIDC Client Secret or any other vendor specific API Key for the integration.
We currently support the following algorithms: RS256, RS384, RS512, PS256, PS384, PS512, ES256, ES256K, ES384, ES512, EdDSA.
Example of a well-known URL is https://viafoura-test.us.auth0.com/.well-known/openid-configuration
Authentication Flow
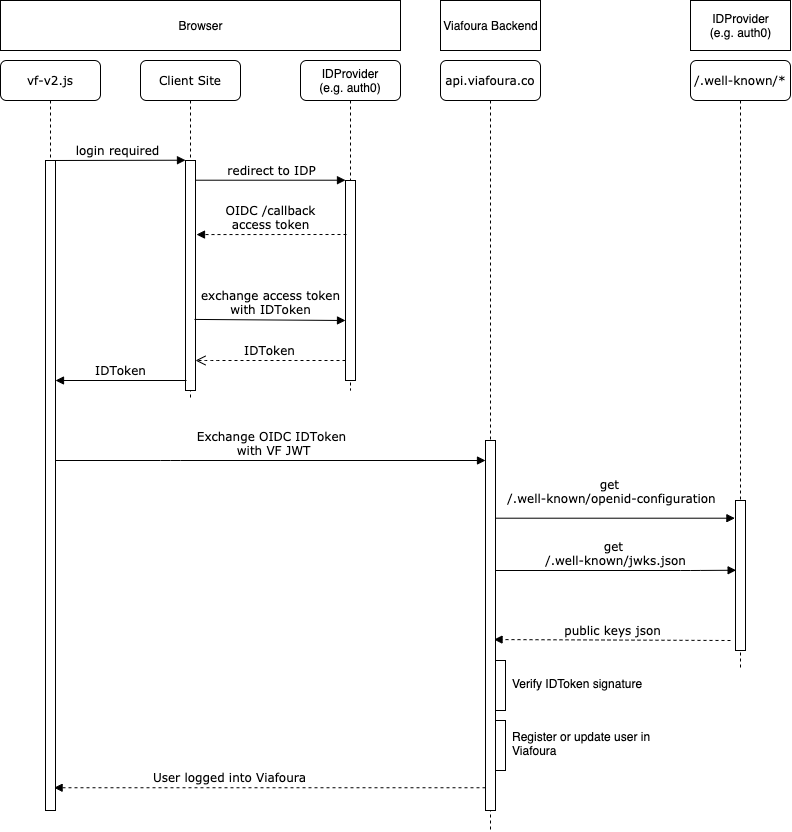
The diagram below shows the end-to-end login flow using Viafoura OIDC integration. This diagram assumes the login flow is initiated by the end user through an action that requires authentication (such as to post a comment, like a comment, follow another user, etc). When attempting the action, Viafoura’s JavaScript library informs the client’s frontend application using our browser side JS callback hooks of the need to login. If the user is already logged in on the client's side, an OIDC ID Token can be passed to Viafoura’s JavaScript library on page load or after login flow completion.

At the high level, the steps from beginning to end for user login to the Viafoura platform are as follows:
-
User initiates login flow from Viafoura widgets or via your own login button or other mechanism.
-
Upon completion of user authentication, your frontend must provide Viafoura's frontend JS library a signed OIDC ID Token including user profile information by calling the below javascript event. For details on how to call Viafoura Javascript events see details here.
// Make vfQ available or use existing one if already loaded
window.vfQ = window.vfQ || [];
window.vfQ.push(() => {
    // viafoura is loaded and window.vf is available
    window.vf.session.login.openIdConnect(idToken);
});
Note
- You should call our JS API login function (window.vf.session.login.openIdConnect(idToken)) when the user logs in
- You should call our JS API login function on each page load to ensure the session doesn't expire.
If we're given an OIDC token with an expiry less than 2 days, we will issue our own tokens with a 2 day lifetime. If you give us a token with a longer expiry, we respect that longer expiry time.
ID Token
Access Token vs. OIDC ID TokenIf your current implementation only provides an AccessToken to your frontend application, you need to exchange the AccessToken with an OIDC ID Token using proper standard OIDC claims. Then, pass the ID Token to Viafoura. We do not exchange your AccessToken with ID Token nor call your OIDC API endpoints for user information (except the public key set for signature validation). All user information is expected to be present in the ID Token. This must be in UTF8 format.
Note: self-signed ID tokens are not supported. Your token must be signed by a third party provider like DigiCert, Comodo, GeoTrust etc
ID Token required claims and their format:
- iss: Usually the uri of the issuer. This field must match the
issuerfield mentioned in your well-known url.
Example: well-known url- aud: The audience of the token. It is usually alphanumerical and must match "OpenID Connect Client ID" configuration set in the admin console.
- iat: The unix epoch time (number of seconds since 1970-01-01) that the token was issued at. The value of this field must be a number.
- exp: The unix epoch time (number of seconds since 1970-01-01) that the token will expire at. It must be in the future or the token is considered to be invalid. The value of this field must be a number.
- "identifier claim": According to OIDC standards, the claim
submust be used as the user's identifier in your system. We have made this configurable and any claim can be used asidentifier. Your system is responsible to make sure this claim is unique within your system and produces the same identifier for the same user.ID Token optional claims and their format:
- "display name claim": Configurable claim for the display name of your users on our widgets. The default claim is
namewhich must represent user's full name. If your users prefer using nicknames, you may override the default. If this claims is not presented in the token, we will use the text "Not Provided" as user's display name.- email: The email address of the user.
- picture: is optional, and must be publicly accessible. This will be the users avatar image which is publicly visible. If an image URL is not passed a default image will be used.
Note that ID Token may have more claims, but we do not use them.
-
Viafoura’s frontend JS library passes your ID Token to our backend.
-
Our backend services retrieve your OIDC public key set using the jwks_uri field present in your provided well-known configuration (conventionally called .well-known/jwks.json)
-
We verify the ID Token's signature on the server side using your public key to ensure the user information provided by your Identity Provider has not been tampered with by the end user.
-
Upon successful ID Token verification, if this is the first time the user is logging into Viafoura, the user is created and their email, name and picture information supplied in the ID Token are recorded in our database. If the user had logged in previously, the user's information is updated in our database. Our system uses the identifier claim that is configured in Viafoura Admin as the unique identifier for users.
-
Upon successful ID Token verification, a Viafoura browser session is created for the user and the user appears logged into our widgets.
Logout
Once the user logs out on your end, you should log out the user from Viafoura in the browser by calling our logout JS method:
// This promise needs to be awaited in a then block or with await, depending on your implementation.
window.vf.session.logout();
User Experience
Viafoura's user interface has several triggers to the authentication process. For example, any action that requires the user to be logged in (posting or liking a comment, following a user or a conversation, etc.) triggers Viafoura's default login workflow if the user is not logged in.
To complete the integration and ensure a cohesive user experience, we recommend you intercept the default Viafoura login workflow to instead trigger your custom authentication. The code snippet below is an example of how you can achieve this:
window.vf.$prepublish((channel, event, ...args) => {
    if (channel === 'authentication' && event === 'needed') {
        window.vf.$publish("tray", "close");
        // add here the handler to trigger your authentication login flow
        return false;
    }
    else {
        return { channel, event, args };
    }
});
If the user logs out of Viafoura, you may pass that action to your authentication system to complete the user logout:
window.vf.$subscribe('authentication', 'logout', () => {
    // add here the handler to trigger your authentication logout flow
});
Notes
- You must call the Viafoura JS OIDC login method mentioned above whenever the user updates their information in order to synchronize their information to the Viafoura system, even if the user is already logged in.
- You are encouraged to call either Viafoura’s login or logout method on every page load to ensure the user's session status is synchronized with your system.
Banned Users
If a user is banned from the system (i.e. not allowed to post comments), you will want to handle that case on your login flow as well. We will send back that the user is banned and any notes your moderator has made to show to the user in this API call, look for the ban_level JSON value in the response. Alternatively, this can be done through Javascript on the page. Once Viafoura detects a login request, it will attempt to log the user into Viafoura, and if this fails Viafoura will publish a Login.Failure, containing the fact the user has been banned and the "Message to user" set by the moderator at the time of banning. You can find more information on how to detect this event here
Updated 30 days ago
