Community Chat Guide
Viafoura's Community Chat tool allows publishers to implement real-time, brand-safe, and highly engaging social chat experience on their sites.
Community chats are short form, fast-paced group chat experiences that can be used to power a chat around a live event, breaking news, next to live video feeds, or as a platform for ongoing chat around a topic.
Key Features of Viafoura Community Chats
- Auto-moderation system, providing you with the peace of mind and the brand-safety of pre-moderation, without the cost and with the rapid velocity that community chats demand
- Message reporting (previously known as flagging)
- Reply to other chat messages
- Author/host tagging
- Real-time New messages indicator and message count
- Rapid real-time manual moderation interface
- Fully integrated with Viafoura suite - no additional integration work required if already a Viafoura customer, tying into existing user authentication integration. As simple as dropping an embed code onto a page.
- User avatars for authenticated users
- Reply indicators and reply notifications in the chat window
Create a new Community Chat
Community chats can either be configured to be on certain pages or templates by default by your development team. Viafoura will work with your development team to implement chats in this way. Alternatively, newsroom or other staff can manually place a new community chat anywhere within an existing article or other content piece on your site once the site is configured.
To manually embed a new community chat within an existing article or other content:
The Viafoura Community Chats tool allows you to place a community chat into your existing CMS using your existing article templates.
NoteThe steps provided here assume a typical publishing CMS workflow, and may be different depending on our CMS configuration and publishing workflows.
- In your CMS create a new article as you would normally. Give it a title, image, introductory text and any other content you want to appear on your community chat page.
- Paste the following custom tag in the body of the article, where you want the top of the community chat to appear:
<div id="livechat-wrapper" style={{ height: "550px" }} class="viafoura"><vf-livechat></vf-livechat></div>The height attribute is required and defines the overall height of the chat tool as it will appear on the page. The recommended height is between 400px to 800px. By default the chat will automatically fill the width of the area it is placed in the site, but the width can be customized using the style attribute. Please contact Viafoura for assistance with advanced style customization.
- Once published, the community chat will be live and active on your site. If you want to schedule a start date for the community chat you can do so by going to the page the community chat is on using an admin or moderator account and accessing the settings from the gear icon on the chat window. Details about chat settings are detailed in the next step.
NoteEach community chat needs a unique ID. Depending on your integration, this ID should be automatically assigned by your CMS. If your CMS is not configured to assign an ID to your community chat, you need to use the below code and manually include a unique identifier. This can be any set of letters and numbers that have not been used on your site before for a community chat. Including the date and name of the blog can help ensure that it is unique:
<div id="livechat-wrapper" style={{ height: "550px" }} class="viafoura">
  	<vf-livechat vf-container-id="[ENTER UNIQUE ID]"></vf-livechat>
</div>
Define Chat settings
-
Community Chat Name: By default, the community chat will be given a name based on the page title and the current date, however you can change this to whatever you want. This name will be shown in the header of the chat and in reports.
-
Community chat start time: Optionally choose the date and time that the community chat will start. If this date is set, users will not be able to post into the chat, and will be shown a message indicating when the chat will begin. Once the start date and time is reached, the chat will open up and users will be able to post messages. By default, community chats go live as soon as they are published. You can override the start date by clicking “Start now”. This will immediately open the chat.
-
**Community chat end time:** Optionally choose the date and time that the community chat will close. Once closed, users will not be able to post messages into the community chat, and a message will appear in place of the text input box. By default the community chat will run indefinitely if no end date is set. You can close a chat by clicking the “End” button. This will immediately close the chat for all users.
-
**Author designation:** Viafoura community chats allow the author of the page to be designated within the community chat. This feature must be configured by developers and uses a meta tag to identify the user ID of the author on the page. If your site already has author designation set up, it will also work on community chats. If your site is not set up for author designation please contact Viafoura for assistance setting up author designation.
-
Character limit for messages: By default, community chats allow 240 characters per chat message, however the character limit can be set to whatever number you prefer. Note that this character limit applies to all chats on the site. Please contact Viafoura if you wish this number to be changed site-wide.
Community Chat Moderation
Note that for the first version of community chat all moderation is done in the chat window - you will need to access the page of your site that contains the embedded chat, and login with either administrator or moderator privileges.
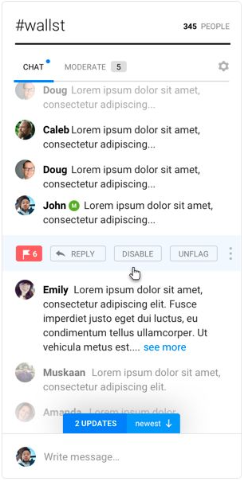
**Inline moderation actions:** Any user with admin or moderator level credentials can moderate messages in the community chat. To access moderation actions from the main chat view, simply click on the vertical ellipsis menu at the far right of each message when hovering over the message.
- Moderating reported (flagged) messages: If a message is reported, you can either disable or remove the report flag on the message.
- Moderating messages that are not reported: Non-reported messages can be disabled or enabled from with the main chat view by clicking the “Disable” or “Enable” button in the ellipses menu.

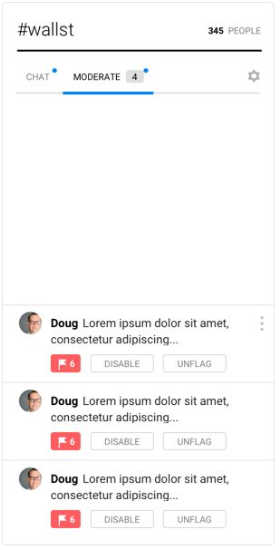
**Moderation tab:** In order to make moderation of high velocity chats easier, Viafoura Community Chats allow you to switch to a moderation queue on the community chat. This queue is available under the “Moderation” tab in the community chat (only visible to moderators or admins). The moderation queue shows a list of reported messages with the moderation actions visible. Taking action on messages in the moderation queue will clear them from the list, and new reported messages will load in real-time into the queue.
As messages are reported, they will become available in the moderation tab, but will not become visible until the “Show new message” button is tapped at the bottom of the chat area. This is a safety feature to ensure that as new messages flow into the queue, it doesn’t cause a moderator to click the wrong message.

Community Chat vs Conversations
Community chat is most commonly used for short form fast paced chronological conversations. When deciding whether to use Community Chat or Conversations please consider the following
| Community Chat | Conversations | |
|---|---|---|
| Moderation | A simple approve/reject based on the algorithm - there is no awaiting moderation feature due to the fast paced nature of the conversation | Comments can be approved, rejected or deferred based on the algorithms decision. |
| Editorial Engagement | Comments can not be featured or pinned | Comments can be featured or pinned and a "Featured Comments" tab opens up in the comment section |
| New User Queue (NUQ) | NUQ is currently not compatible with Community Chat | NUQ can be activated to send all newly registered users comments to awaiting moderation |
| Sort Options | Can not be sorted | Can be sorted by oldest, newest, most likes or most replies |
Updated 5 months ago
