Live Blog Guide
Viafoura’s Live Blogging tool allows you to quickly and easily publish and curate content in real-time on your site. By combining original content from your staff, and existing content from social media pertaining to an event or unfolding story, you can provide a deep and highly engaging experience for your audience.
Features of Viafoura’s live blogging tool
- Updates in real time for everyone watching the blog
- Rich text formatting
- Embed previews of links to social media and almost any other URL
- Pin posts to the top of the live blog
- Allow any number of staff members to contribute to a live blog in real time from any device or location
- Use your existing account on your own site, no need to remember yet another username and password
- Put a new live blog up very quickly to easily start covering breaking news events before your competition
To create a new live blog
The Live Blogging tool allows you to place a live blog into your existing CMS using your existing article templates.
NoteThe steps provided here assume a typical publishing CMS workflow, and may be different depending on our CMS configuration and publishing workflows.
- In your CMS create a new article as you would normally. Give it a title, image, introductory text and any other content you want to appear on your live blogging page. Or create a new live blog if they have been pre-configured in your CMS.
- If you used a standard story article template in your CMS or are adding a live blog to an existing article, paste the following tag in the body of the article, where you want the top of the live blog to appear:
<vf-live-blog class="viafoura" ></vf-live-blog>
Note:Each live blog needs a unique ID. Depending on your integration, this ID should be automatically assigned by your publishing system (Viafoura can assist with setting this up). If your publishing system is not configured to assign a unique ID to your live blog, you will need to use this code and manually include a unique identifier, this can be any set of letters and numbers that have not been used on your site before for a live blog. The ID can be any unique string, so using the ID of the article, or Including the date and name of the live blog can help ensure that it is unique:
- Save your article in draft mode or any mode that allows you to access the page on the front end of your site.
- Go to the page where your live blog has been published and log in using your admin or moderator site credentials.
NoteYou must have either administrator or moderator level permissions on your site in order to be able to set up or post content to a live blog.
- You should see something like the following on your article page:
If you do not see the live blog settings and post entry field on the page, verify that you are logged in with an account that has admin or moderator access.
- You are now able to manage the settings for your blog and start posting content using the steps in the next section of this guide.
- Once the settings and content are to your liking, you can publish your article from your CMS.
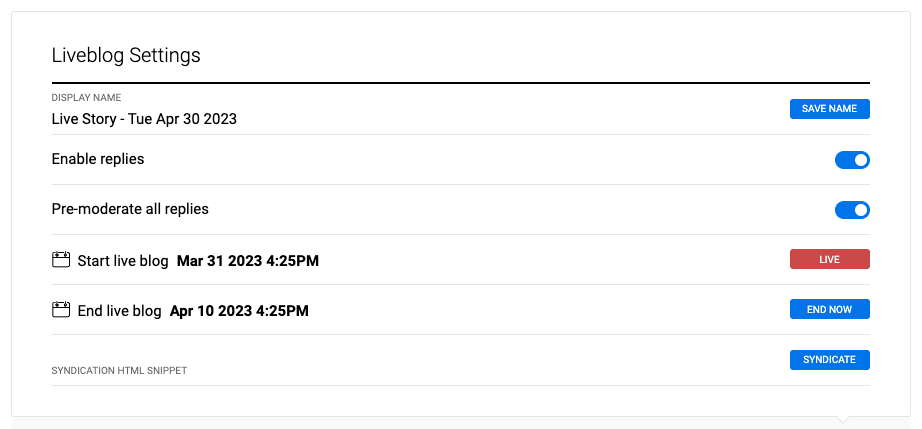
Define your Blog settings
1. Live Blog Display Name: By default, your live blog will automatically be given a name based on the page title and the current date, however you can change this to whatever you want. This name is not displayed to users and is used to identify live blogs within your admin system and reporting tools only.
NoteSwitching pre-moderation on or off does not change the moderation state of content that has already been ingested into the live blog, it only effects any new content that comes in.
2. Live blog start time: Choose the date and time that you intend your live blog to start being active. The date and time does not impact the visibility of the blog and you can still publish to the blog and manually post content before this date and time. Clicking 'Start now' will set the start time to the current date and time.
3. Live blog end time: Choose the date and time that you intend your live blog to stop being active. The end date and time does not change the visibility of the blog and you can continue to post content manually to the live blog. Clicking 'End now' will set the end time to the current date and time.
4. Enable Replies: Turn this on to allow users to reply to individual posts within the live blog. Replies will be subject to your site wide moderation settings and auto-moderation system if used.
5. Pre-moderate Replies: This setting, if turned on, allows you to review all user submitted replies prior to publishing. You can then manually approve only the replies you want to appear in the live blog.
Write and publish a post
- Click on “Type post” to begin creating your first blog post:

- Once you have entered text you can highlight it and apply styles including:
- Link
- Bold
- Italics
- Block quote
- Header 1
- Header 2
- Numbered and unordered lists
- Or clear already applied styles

- Upload images from your hard drive (up to 10mb) using the image upload icon. Once placed, images can be deleted by placing the cursor after the images and pressing the delete key on your keyboard.
Image TypesSupported: jpg, png, gif
Not Supported: webp, heic
*Please note that copy/pasting images from the clipboard is not supported.
- Placing a URL into the post will usually render an embed preview of the URL. This is useful for embedding social media and other sources into a live blog.
Note: Facebook and Instagram Embedding restricted by FacebookFacebook has recently updated their embedding APIs to require authentication, effectively preventing embedding content in a public setting. Our embedding partner is working with Facebook to try to resolve this issue, but for now Facebook and Instagram post embedding within Live Blogs is not supported.

If you do not want the embed to be displayed in your blog post, you can remove it by placing the cursor after the embed and clicking “delete” on your keyboard.
If you want to show only the embed and not the URL that generated it, you can simply highlight and delete the URL from the post and the embed will remain in place.
-
Once your post is ready, you can click the “Post” button to publish it in real time to the live blog.
-
To pin a post to the top of the blog click the “•••” icon on the right side of the post and chose “Pin post”. This will keep that post at the top of the blog for all users as new content comes in. You can unpin the same way, and the post will return to it’s original position in the blog.
NoteAlthough you can pin as many posts as you want, we highly recommend limiting the number of pinned posts to one or two in order to not impact the user experience of the live blog.
- If you want to remove or edit a post after it has been published simply click the “•••”icon on the right side of the post and choose one of the following options:
a. Edit - allows you to edit the blog post
b. Remove Post - Deletes the post entirely and removes it from the live blog for all users currently on the live blog
c. Disable Post - Hides the blog post from readers but keeps the post visible to users with moderator or admin level access
Updated 10 months ago